
Every company that runs multiple servers in the Public & Private Cloud has rolling snapshot schedules to automate system backups and resilience. This is a common situation that we frequently encounter. However, many of us would prefer to take instant snapshots rather than waiting for scheduled snapshots when performing operations on these servers, such as patching or fixing an issue. The example I will give below will make the situation more clear.
The Security team has informed you about a security vulnerability in our servers based on a recent CVE report. We need to patch and take snapshots of 40 servers or more across multiple projects immediately. If you, like me, do not enjoy repetitive tasks, you need to find a solution.
This article discusses the development of an automated solution for this type of problem in GCP. You can expand this example by creating different logic for any resource.
Steps
- Service Account Creation
- Preparing Module Source
- Preparing Container to Run Jobs
- Preparing Python MakeVariables Script
- Preparing Pipeline
- Implementation
- Conclusion

Architecture
Service Account Creation
Although this step may seem simple, it is actually quite critical. The permission we need is roles/compute.instanceAdmin.v1.
When granting this permission to a service account, if your projects are under the organization, you can create a service account within the organization scope. If you are using a free account, you must grant the permission to the same service account in your other projects (Cross project service account).
I mention this specifically because the Terraform provider configuration is a static variable (If you want to know how to make it dynamic check out my Terragrunt article). It’s not allowed to give a provider configurations includes many project ID’s, you can only give one.
Although the logic may not appear correct (you may wonder how to create a snapshot in project X while the provider configuration directs to project Y), I will explain how this works correctly in the following section by tweaking a little block property.
Additionally, if you want to store your state in a remote location, you will need to provide proper credentials. In this example, I use GCS (Google Cloud Storage), so my service account also has the necessary permissions to write state in a remote bucket.
Preparing Module Source
You can think of this part as creating an interface to make the pipeline phase more user-friendly.
You can check my repository directly to see how this module works. (It’s quite simple)
Beyond this pipeline, you can use this source in various ways, such as creating multiple snapshots or manually creating a single snapshot, inspect the readme for detailed usage.
Below you see the main.tf file. Here, timestamp is added to the snapshot naming section for a useful naming. Since it is necessary to take a snapshot of the boot disk for backup, the data of the relevant disk also needs to be taken.
The timeout part is important because Google APIs may not communicate satisfactorily with Terraform. (You may experience timeouts even if the resource is created successfully.)
// main.tf
locals {
    timestamp = timestamp()
    current_day = formatdate("YYYY-MM-DD", local.timestamp)
}

data "google_compute_disk" "persistent_boot_disk" {
  name    = var.persistent_disk_name
  project = var.project
  zone = var.zone
}

resource "google_compute_snapshot" "snapshot" {
  name        = "${data.google_compute_disk.persistent_boot_disk.name}-${local.current_day}"
  source_disk = data.google_compute_disk.persistent_boot_disk.self_link
  zone = data.google_compute_disk.persistent_boot_disk.zone

  timeouts {
    create = "10m"
    update = "5m"
    delete = "15m"
  }

}
If you are going to create a single snapshot, you can directly use the repo (not recommended). Alternatively, you can modularize this Terraform source and provide variables as shown below. This approach allows you to create multiple snapshots in the same way manually.
// Example Variables.tf
variable "disk_configs" {
  type    = list(map(string))
  default = [
    {
      "name"    = "example",
      "project" = "example",
      "zone"    = "example",
    },
    {
      "name"    = "test-2-instance",
      "project" = "project-id",
      "zone"    = "europe-west3-c",
    },
  ]
}
module "snapshoot" {
  source = "github.com/asrinandirin/snapshot-gce"
  count = length(var.disk_configs)
  disk_name = var.disk_configs[count.index]["name"]
  project = var.disk_configs[count.index]["project"]
  zone    = var.disk_configs[count.index]["zone"]
}
If you are feeling confused, try to be a little more patient. Everything will fall into place, at least until the pipeline part.
Preparing Container to Run Jobs
In the following steps, pipeline will be executing a Python script that generates variables.tf from the provided CSV file in each pipeline stage. Additionally, we will run Terraform commands within the jobs. To do this, we require a container that meets our requirements and includes the necessary specifications to use it in jobs.
For all of my Cloud Automations & Terraform Pipelines, I use a container that can run Python, Terraform, and Gcloud. You don’t need Gcloud here, it is just very useful for general cloud automation tasks.
It’s a simple and basic container that fulfills all my needs 😄. If you want to extend its features and abilities, you can use the provided Dockerfile. Alternatively, you can use my container directly from Docker Hub with the tag asrinandirin/tf-gcloud-python:v2.
FROM ubuntu:latest

ENV DEBIAN_FRONTEND=noninteractive

RUN apt-get update && \
    apt-get install -y \
    wget \
    unzip \
    python3 \
    python3-pip \
    git

RUN wget https://releases.hashicorp.com/terraform/0.14.10/terraform_0.14.10_linux_amd64.zip && \
    unzip terraform_0.14.10_linux_amd64.zip && \
    mv terraform /usr/local/bin/ && \
    rm terraform_0.14.10_linux_amd64.zip

RUN echo "deb [signed-by=/usr/share/keyrings/cloud.google.gpg] http://packages.cloud.google.com/apt cloud-sdk main" | tee -a /etc/apt/sources.list.d/google-cloud-sdk.list && \
    apt-get install -y apt-transport-https ca-certificates gnupg && \
    wget https://packages.cloud.google.com/apt/doc/apt-key.gpg && \
    apt-key --keyring /usr/share/keyrings/cloud.google.gpg add apt-key.gpg && \
    apt-get update && \
    apt-get install -y google-cloud-sdk

CMD ["bash"]
Preparing Python MakeVariables Script
Below is the Python script that enables this pipeline. It reads the provided CSV file and creates the variables.tf file, which allows Terraform to create multiple snapshots.
The CSV file that needs to be placed in the Golden Repo(Main Gitlab Repo) should be formatted as follows:

Be careful when you filling zone column, because zones can be vary as text length, pipeline may throw an error if you don’t fill them in “ “.
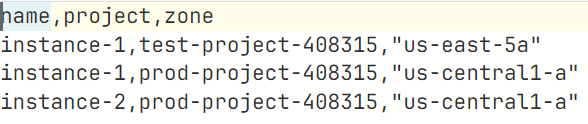
Proper Raw Text
import csv

def read_csv_and_generate_tf_variables(csv_file_path):
    variables = []

    with open(csv_file_path, 'r') as file:
        reader = csv.DictReader(file)
        for row in reader:
            disk_config = {
                "name": row["name"],
                "project": row["project"],
                "zone": row["zone"]
            }
            variables.append(disk_config)

    return variables

def generate_tf_variables(variables):
    tf_code = 'variable "disk_configs" {\n'
    tf_code += '  type    = list(map(string))\n'
    tf_code += '  default = [\n'

    for disk_config in variables:
        tf_code += '    {\n'
        tf_code += f'      "name"    = "{disk_config["name"]}",\n'
        tf_code += f'      "project" = "{disk_config["project"]}",\n'
        tf_code += f'      "zone"    = "{disk_config["zone"]}",\n'
        tf_code += '    },\n'

    tf_code += '  ]\n'
    tf_code += '}\n'

    return tf_code

csv_file_path = "input.csv"

variables = read_csv_and_generate_tf_variables(csv_file_path)

tf_code = generate_tf_variables(variables)

print(tf_code)

with open("variables.tf", 'w') as tf_file:
    tf_file.write(tf_code)
This script will be running on every stages to making enable Terraform checks & deployment.
Preparing Pipeline
There is nothing unusual in the Pipeline. The first two stages involve communication between Terraform and the existing infrastructure to determine if they are in sync. If everything is as desired, resources can be deployed to our environment. I have left the Apply stage as a manual step, just in case.
stages:
  - validate
  - plan
  - deploy

default:
  image:
      name: asrinandirin/tf-gcloud-python:v2

before_script:
  - python3 ./make-variables.py
  - cat $GCP_SERVICE_ACCOUNT_KEY > service-account.json
  - terraform init

validate:
   stage: validate
   script:
     - terraform validate
   rules:
     - changes:
         - input.csv

plan:
   stage: plan
   script:
     - terraform plan -out "planfile"
   dependencies:
     - validate
   artifacts:
     paths:
       - planfile
   rules:
     - changes:
         - input.csv

apply:
   stage: deploy
   script:
     - terraform apply -input=false "planfile"
     - rm variables.tf
   dependencies:
     - plan
   when: manual
   rules:
     - changes:
         - input.csv
Implementation
Since we will use this solution as Terraform Module, we lastly need to configure a provider.
// Provider.tf
terraform {
  required_providers {
    google = {
      source = "hashicorp/google"
      version = "5.7.0"
    }
  }
  backend "gcs" {
    bucket  = "tf-state-prod"
    prefix  = "terraform/state"
  }
}

provider "google" {
  credentials = file("./service-account.json")
  project = "Any Project id that service account authorized"
}
So far so good, we just need to clarify one thing.
How can this provider access the other projects that we provide in the input.csv file ?
Since the service account has the necessary access and permissions in the projects, Terraform can easily make calls to the required Google APIs. The line specified below sends queries as self_link for the source disk, including the targeted project IDs already.
Example Self_link : projects/{{targeted_project_ID}}/zones/{{zone}}/disks/{{name}}
source_disk = data.google_compute_disk.persistent_boot_disk.self_link
Now we can trigger the pipeline, all we need to do is fill the input.csv file and commit it.
Results
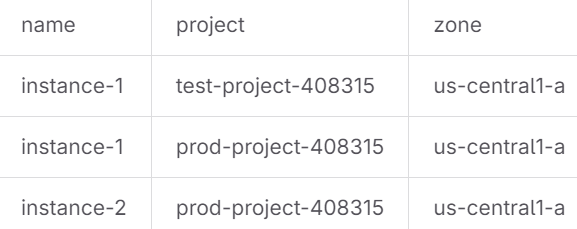
I commited this CSV to the repository
Each stage passed, Apply step is waiting for me to run the job.

After I run the job manually, It’s applying the configuration.

Deployed objects.

Test project
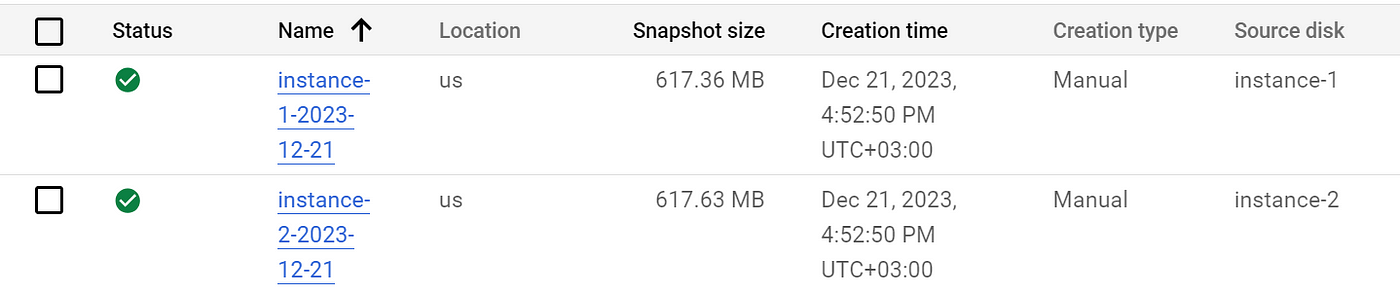
Prod project
Conclusion
Infra automation brings happiness to everyone by eliminating repetitive work and allowing us to focus on our own development. It also enables less eventful resource management.
I expect you to realize that you can extend this implementation for any resource you want, you are not limited with snapshots.
CSV was specifically chosen as the input source because even people who do not have expertise in how Terraform, GCP, or Gitlab pipelines work can easily fill in a CSV and push it to the appropriate repository to run configured jobs and get what they want. This way, you can design interfaces that will meet the needs of your team and other teams, making everyone’s work easier.