In this article, we will integrate ScoutSuite with Cloud Run. By following the steps in this article, you will be able to scan your cloud environment at the desired intervals. The scan reports will then be written to the GCS bucket that you specify.
What is ScoutSuite ?
ScoutSuite is an open-source, multi-cloud security auditing tool. It assesses the security of cloud environments on platforms like AWS, Azure, GCP, and Alibaba Cloud. ScoutSuite is popular among security professionals, cloud administrators, and DevOps teams for ensuring cloud infrastructure security and compliance. Here is how it works:
Scout Suite gathers information about your cloud environment by making API requests to the cloud provider’s services. It retrieves data on virtual machines, databases, storage, networking, and more. It evaluates the configuration settings of your cloud resources. It checks for security best practices, compliance with industry standards, and common misconfigurations that could pose security risks.
Scout Suite employs a rule-based engine with predefined checks. These rules cover security considerations such as firewall settings, access controls, encryption, IAM policies, and more. The tool assesses your resource configuration against these rules. Scout Suite assigns a score or severity level to each security finding or issue. It generates a detailed report summarizing the assessment results, listing the security issues and their severity. This report helps security teams identify areas that require attention and remediation.
Scout Suite allows users to customize rules and checks to align with their security policies and requirements. You can add your own rules or modify existing ones to tailor the tool to your organization’s needs. The tool can be integrated into existing DevOps or security workflows, automating security assessments of your cloud infrastructure. It generates output in various formats (JSON, CSV, and HTML) that can be integrated into other tools or dashboards.
Implementation Steps
- Creation of required resources
- Integration
- Deploy and test the app
- Conclusion
Required Resources
- Service account for ScoutSuite.
- Artifact Registry for storing ScoutSuite Image.
- GCS Bucket for Storing Reports.
Service Account
ScoutSuite requires these roles for proper functionality. Additionally, the storage object user role is required for writing reports to the bucket.
- roles/stackdriver.accounts.viewer
- roles/iam.securityReviewer
- roles/viewer
- roles/storage.objectUser
GCS Bucket
Bucket names are unique. I use random id to ensure greater accuracy of this. The other configurations are optional.
Artifact Registry
The only must here is format, It ****must be Docker. The other configurations are optional.
Deploying the Necessary Resources
terraform {
  backend "gcs" {
    bucket = "<remote-backend-bucket>"
    prefix = "prefix"
  }
}

provider "google" {
  credentials = file("/path/to/credentials.json")
}

//Service Account
module "service-account-module" {
      source= "github.com/asrinandirin/GCP-IAM/Service-Account/Service-Account-With-Roles-V1"
      service_account_name          = "sa-scout-tf"
      project_id                    = "<Project ID>"
      roles                         = ["roles/stackdriver.accounts.viewer","roles/iam.securityReviewer","roles/viewer","roles/storage.objectUser"]
    }

//Bucket
resource "random_integer" "bucket_id" {
  min = 1000
  max = 9999
}

resource "google_storage_bucket" "my_bucket" {
  name          = "scout-bucket-${random_integer.bucket_id.result}"
  location      = "US"
  force_destroy = false
  project = "<Project ID>"

  versioning {
    enabled = true
  }

  # Configure access control (example: make the bucket publicly accessible)
  uniform_bucket_level_access = true
}

output "bucket_name" {
  value = google_storage_bucket.my_bucket.name
}

//Artifact Registry
resource "google_artifact_registry_repository" "my_repo" {
  location      = "us-central1"
  repository_id = "scoutsuite-repository"
  description   = "example docker repository"
  format        = "DOCKER"
  project = "<Project ID>"
}

output "repository_name" {
  value = google_artifact_registry_repository.my_repo.repository_id
  description = "Artifact Registry Repository Name"
}

output "repository_location" {
  value = google_artifact_registry_repository.my_repo.location
  description = "Artifact Registry Repository Location"
}

output "repository_format" {
  value = google_artifact_registry_repository.my_repo.format
  description = "Artifact Registry Repository Package Format"
}
Applying Terraform codes
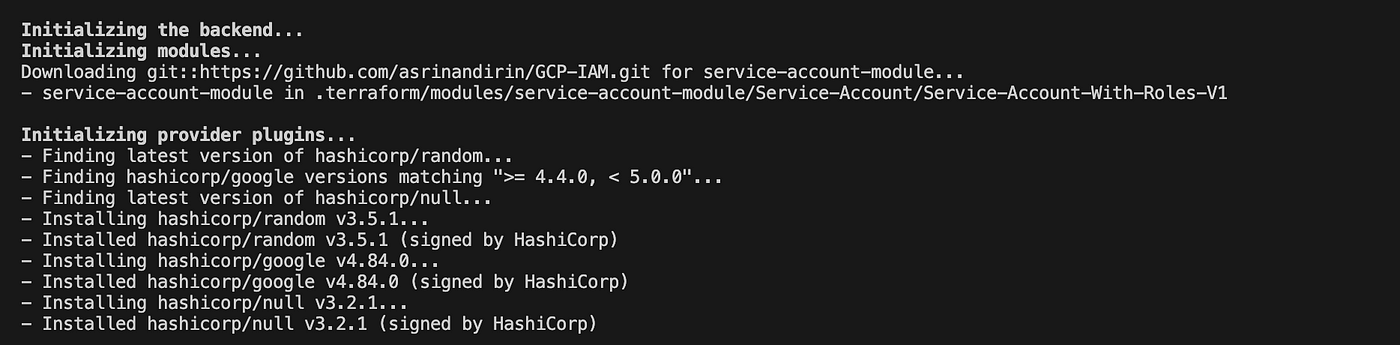
Terraform init
Terraform plan & apply
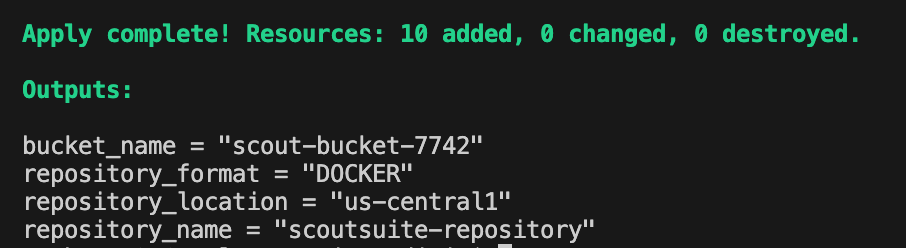
Required resources are created.


Integration Part
- Cloud Run overview
- Shell Scripts
- Dockerfile modification
- Build and push the Image
- Deploy
- Results
Cloud Run Overview
Cloud Run is a serverless computing platform provided by Google Cloud that allows you to run containerized applications in a fully managed environment. There are two solutions in Cloud Run: one is a service, and the other is a job. These are two different deployment options within Google Cloud Run, each suited for specific use cases.
- Cloud Run services:
- Stateless Services: Cloud Run services handle HTTP requests and are used for web applications, APIs, and microservices. Each request is handled independently, without a persistent state.
- HTTP Endpoints: Cloud Run services serve HTTP and HTTPS traffic, scaling based on incoming requests. Concurrency settings can be configured to manage simultaneous requests.
- Continuous Deployment: Cloud Run services support continuous deployment of applications. Code updates can be deployed without service disruptions. Custom domains, authentication, and environment variables can be configured.
- Scaling: Cloud Run services can scale to zero when not in use and scale up to handle traffic. Suitable for services with varying workloads.
2. Cloud Run Jobs:
- One-Off Tasks: Cloud Run Jobs run containerized tasks or jobs without serving HTTP requests. These are background processes that perform specific tasks like data processing, batch jobs, or periodic tasks.
- No HTTP Endpoints: Cloud Run Jobs don’t have HTTP endpoints and are not designed for handling incoming HTTP requests. Instead, they are triggered using event-based mechanisms like Pub/Sub messages or task scheduling.
- Finite Execution: Cloud Run Jobs run until completion and then terminate. They are useful for running tasks once or periodically.
- Parallel Execution: Cloud Run Jobs support running multiple instances of the same job in parallel, which is helpful for distributing or concurrently processing tasks.
Since our solution will not handle any HTTP requests, we will continue with the Cloud jobs.
Shell Scripts
With Cloud Run Jobs, as soon as a container executes, you can no longer intervene in that container. Therefore, we expect the container to be run to handle all operations automatically (running ScoutSuite and pushing reports to the GCS bucket). That’s why we need to configure our application for this purpose.
We need two main scripts: one will process the parameters required to run ScoutSuite, and the other will be a shell script that will load the reports.
The scout-runner.sh script will be the entrypoint of our container. This script will also run the scout command and run the report-uploader.sh script within itself.
In Dockerfile, the entrypoint is the command that runs when the container starts.
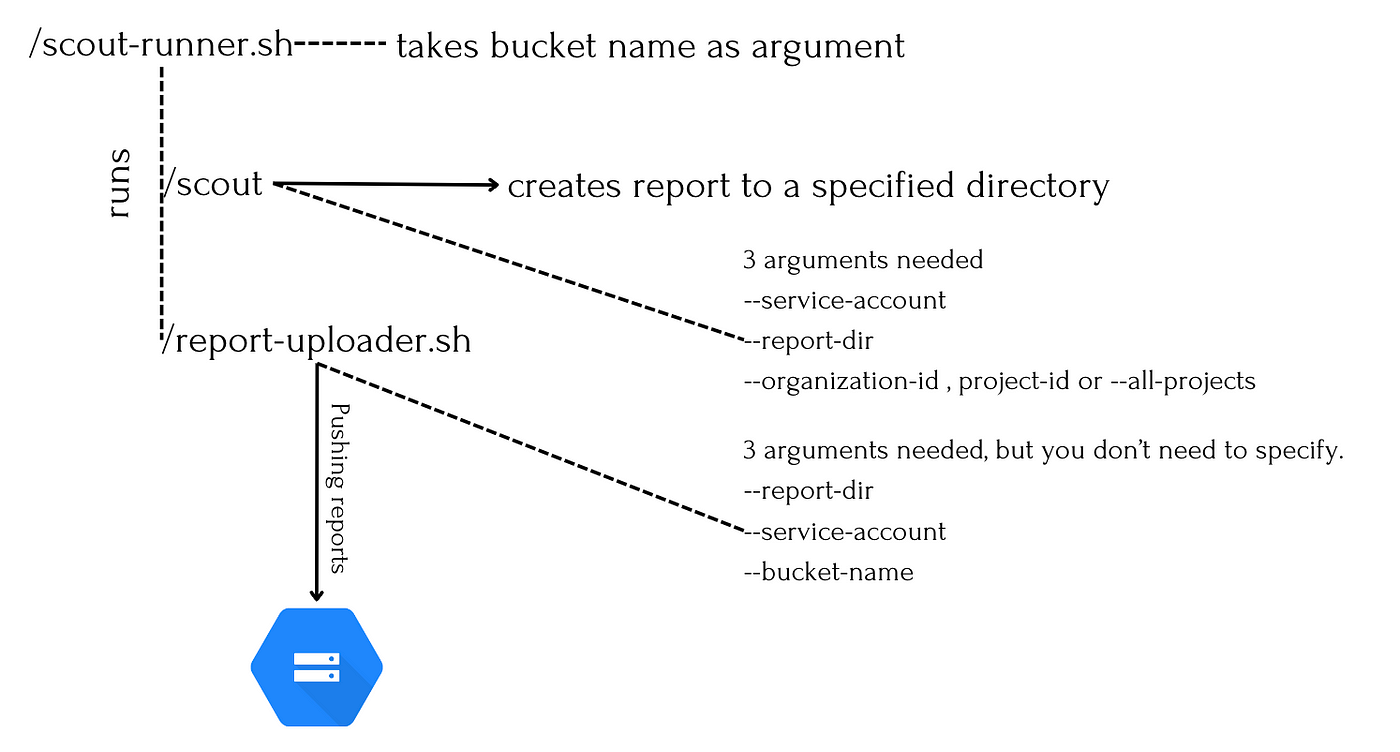
Script Hierarchy
scout-runner.sh
#!/bin/sh

BUCKET_NAME=$1
SERVICE_ACCOUNT="<Exact Service Account Name>"
REPORT_DIR="report-$(date '+%d-%m-%Y')"

# Run the scout command
/root/scoutsuite/bin/scout gcp --service-account "$SERVICE_ACCOUNT" --report-dir "$REPORT_DIR" --all-projects

/root/report-uploader.sh $REPORT_DIR $SERVICE_ACCOUNT $BUCKET_NAME
$1: Google Cloud Storage bucket name for report upload.SERVICE_ACCOUNT: Google Cloud service account name for running “ScoutSuite” tool.REPORT_DIR: Directory name for report with current date in “report-dd-mm-yyyy” format./root/scoutsuite/bin/scout gcp: This command runs the “scout” tool for assessing Google Cloud Platform (GCP) security.service-account "$SERVICE_ACCOUNT": Specifies the service account for authentication.report-dir "$REPORT_DIR": Specifies the directory where the report will be generated, including the current date.all-projects: This flag instructs “scoutsuite” to assess all projects in the GCP organization associated with the service account.
report-uploader.sh
#!/bin/sh
SERVICE_ACCOUNT_KEY=$2
BUCKET_NAME=$3
DESTINATION_PREFIX=$1
FOLDER_TO_UPLOAD=$1
if [ ! -f "$SERVICE_ACCOUNT_KEY" ]; then
echo "Service account key file not found: $SERVICE_ACCOUNT_KEY"
exit 1
fi
gcloud auth activate-service-account --key-file="$SERVICE_ACCOUNT_KEY"
gsutil -m cp -r "$FOLDER_TO_UPLOAD" "gs://$BUCKET_NAME/$DESTINATION_PREFIX/"
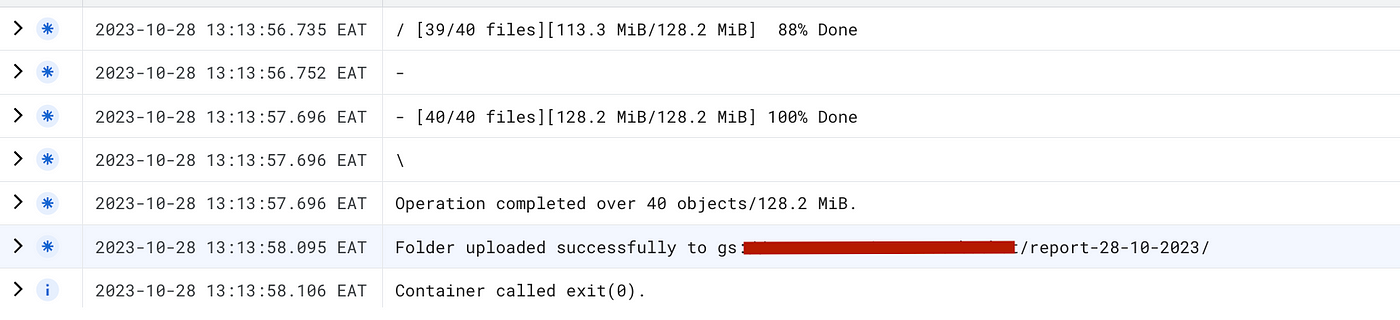
if [ $? -eq 0 ]; then
echo "Folder uploaded successfully to gs://$BUCKET_NAME/$DESTINATION_PREFIX/"
else
echo "Folder upload failed."
fi
- The script checks if the specified service account key file
$SERVICE_ACCOUNT_KEYexists. If not, it displays an error message and exits with a non-zero status code. - The script activates the service account using the command
gcloud auth activate-service-accountwith the service account key file ($SERVICE_ACCOUNT_KEY) for authentication. - The script uses
gsutilto copy the local folder specified by$FOLDER_TO_UPLOADto the Google Cloud Storage bucket (gs://$BUCKET_NAME/$DESTINATION_PREFIX/), with parallel copying for improved performance. - The script checks the
gsutilcommand exit status. If it’s0, a success message is printed for successful folder upload. If it’s non-zero, an error message is printed for failed folder upload.
Dockerfile Modification
https://github.com/nccgroup/ScoutSuite/blob/master/docker/Dockerfile
The provided Dockerfile builds a Docker image based on the official Python 3.8 image. It includes configurations, labels, environment variables, and commands for installing software and setting up the environment.
I start by removing unnecessary elements. Since I will only scan GCP projects, I removed the helper scripts for AWS and Azure. Unfortunately, the GCP helper script given here does not work as we wish and has a key error in the Debian repositories. That’s why we need to install the gcloud and gsutil components manually. Here are the added and removed lines, respectively.
# Removed
RUN ["/bin/bash", "-c", "/root/bin/container-install-aws2.sh"]

RUN ["/bin/bash", "-c", "/root/bin/container-install-azure.sh"]

RUN ["/bin/bash", "-c", "/root/bin/container-install-gcp.sh"]

#Added
RUN curl https://dl.google.com/dl/cloudsdk/release/google-cloud-sdk.tar.gz > /tmp/google-cloud-sdk.tar.gz

RUN mkdir -p /usr/local/gcloud \
  && tar -C /usr/local/gcloud -xvf /tmp/google-cloud-sdk.tar.gz \
  && /usr/local/gcloud/google-cloud-sdk/install.sh

ENV PATH $PATH:/usr/local/gcloud/google-cloud-sdk/bin
Afterwards, we need to copy the scout-runner and folder-uploader scripts to the container and make them executable.
#Added
COPY folder-uploader.sh /root/
COPY scout-runner.sh /root/

RUN chmod +x /root/folder-uploader.sh
RUN chmod +x /root/scout-runner.sh
And finally, let’s give the scout-runner script as entrypoint.
#Added
ENTRYPOINT ["/root/scout-runner.sh"]
Build and Push Image
Since we will push the container to the Artifact Registry, we need to authenticate to the registry first and then tag our Docker image appropriately.
Auth to the registry
gcloud init //Login

gcloud config list //Check your current configuration

gcloud auth configure-docker <region-to-registry>-docker.pkg.dev //Auth to the registry
Build Image
There is nothing specific in the image build, but if you are using an m1 Mac , you should put this — platform=linux/amd64 flag since Cloud Run runs on Linux as its base.
docker build --platform=linux/amd64 -t scout-suite:latest .
Then, tag & push the image properly
//Tag
docker tag SOURCE-IMAGE LOCATION-docker.pkg.dev/PROJECT-ID/REPOSITORY/IMAGE:TAG
//Push
docker push LOCATION-docker.pkg.dev/PROJECT-ID/REPOSITORY/IMAGE
Deploy
Finally, we have reached the fun part. Now, we will deploy the image. First, let’s move on to Cloud Run.

Create Job
Select your image that you previously pushed to the artifact registry, you can also select another projects artifacts.
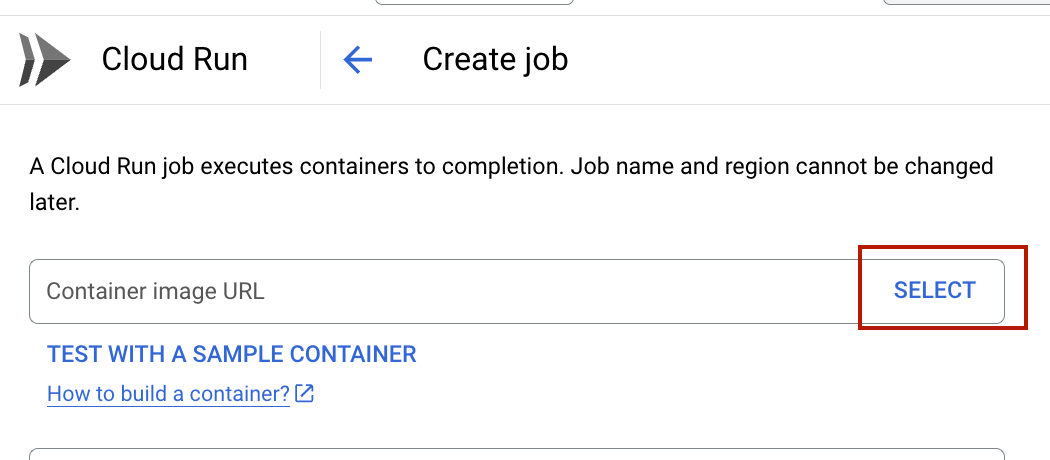
Remember that we gave entrypoint as the scout-runner.sh. It takes bucket name as argument. Here you can give any bucket that the service account is authorized for.

It takes an average of 1 to 1.5 hours to complete an organization scan job with these configurations. Of course, if you reduce the resources here, it will take longer.
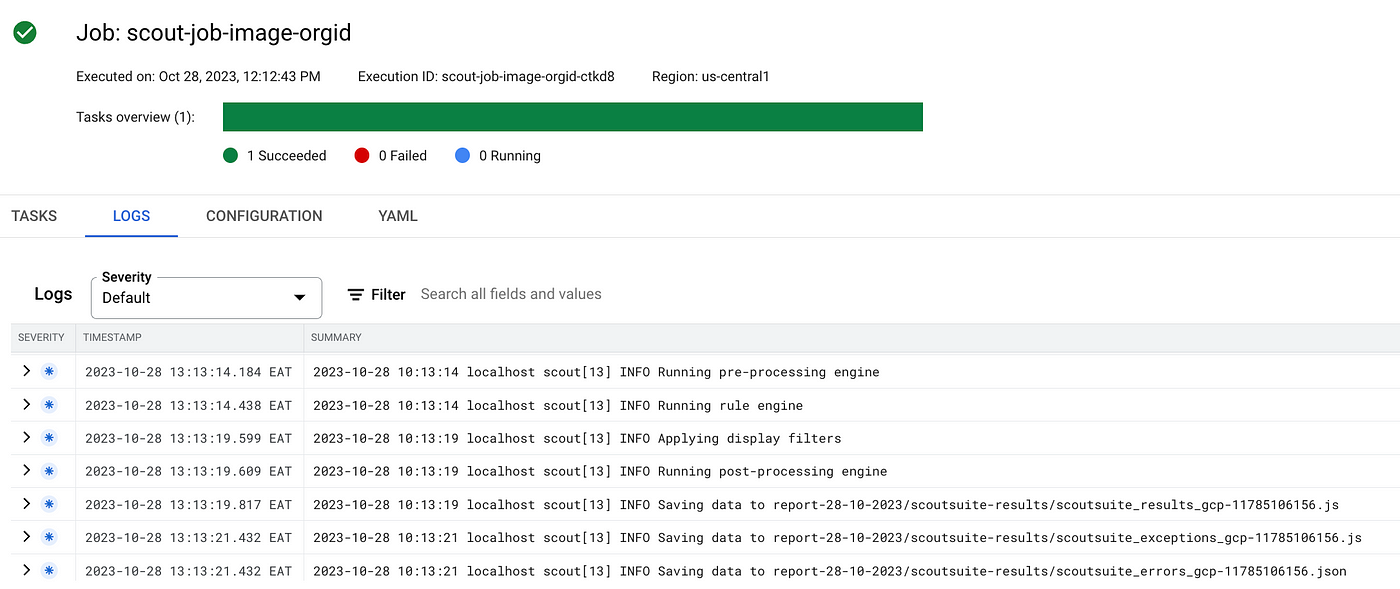
ScoutSuite will warn you if some of your APIs are not enabled. You may encounter many warnings and errors during your scan. Additionally, you will also see that the logs are stuck as a result of some API scans. No matter what, do not terminate the job. When you wait until the end, you will receive your reports. Therefore, the number of retries per failed task was kept at 8.

You can watch the logs on the log’s page or via the logging service. Additionally, you can track the CPU and RAM consumption and utilization of your container via monitoring.
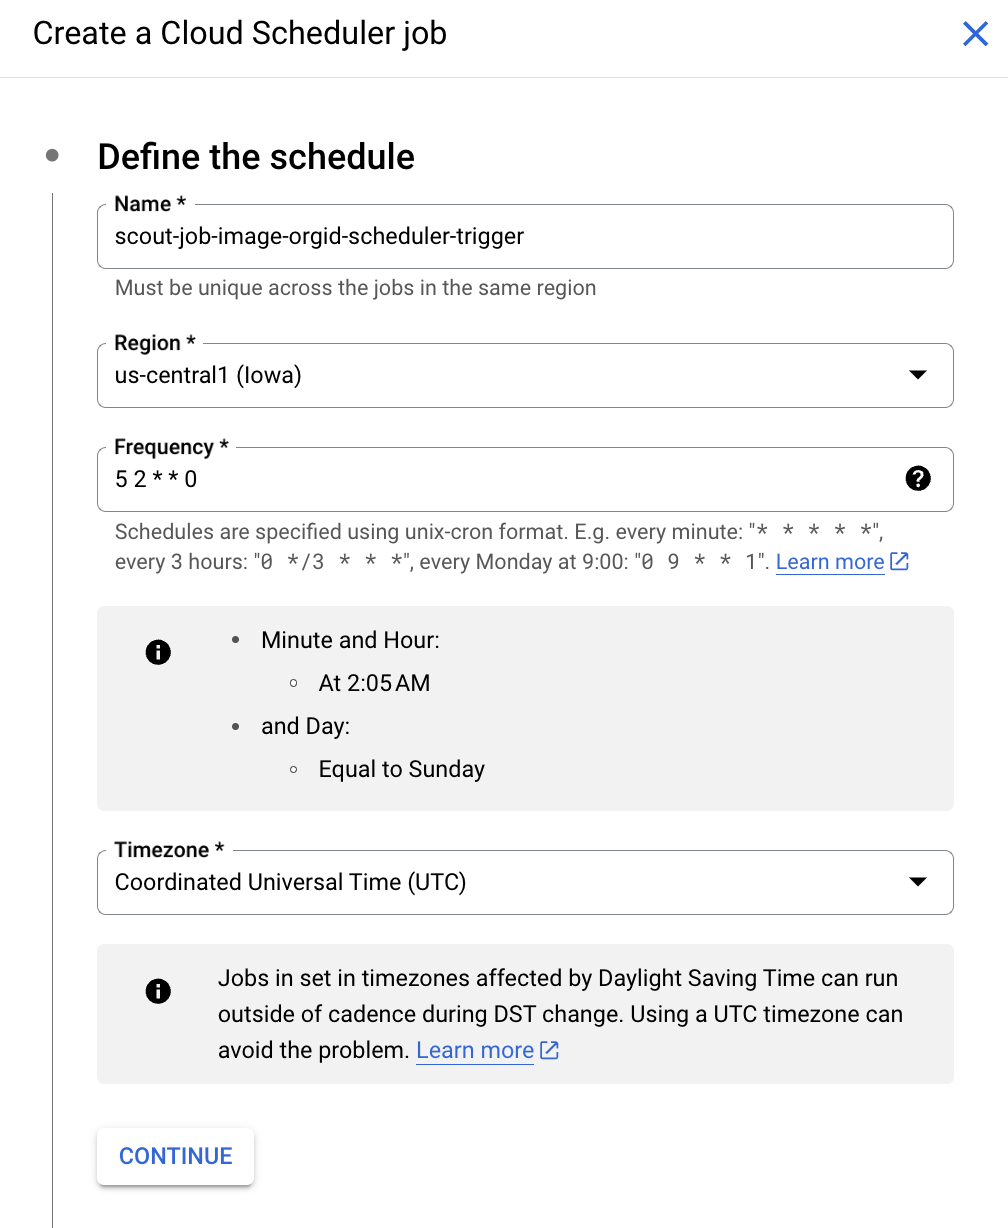
And finally, I want this Job to scan my entire organization once a week. For this, let’s add Cloud Scheduler as a trigger in the configurations.
Here, determine your crony time by taking into account the quota limits you have set for your organization or project because, especially in organization scans, Scoutsuite consumes a lot of quota..
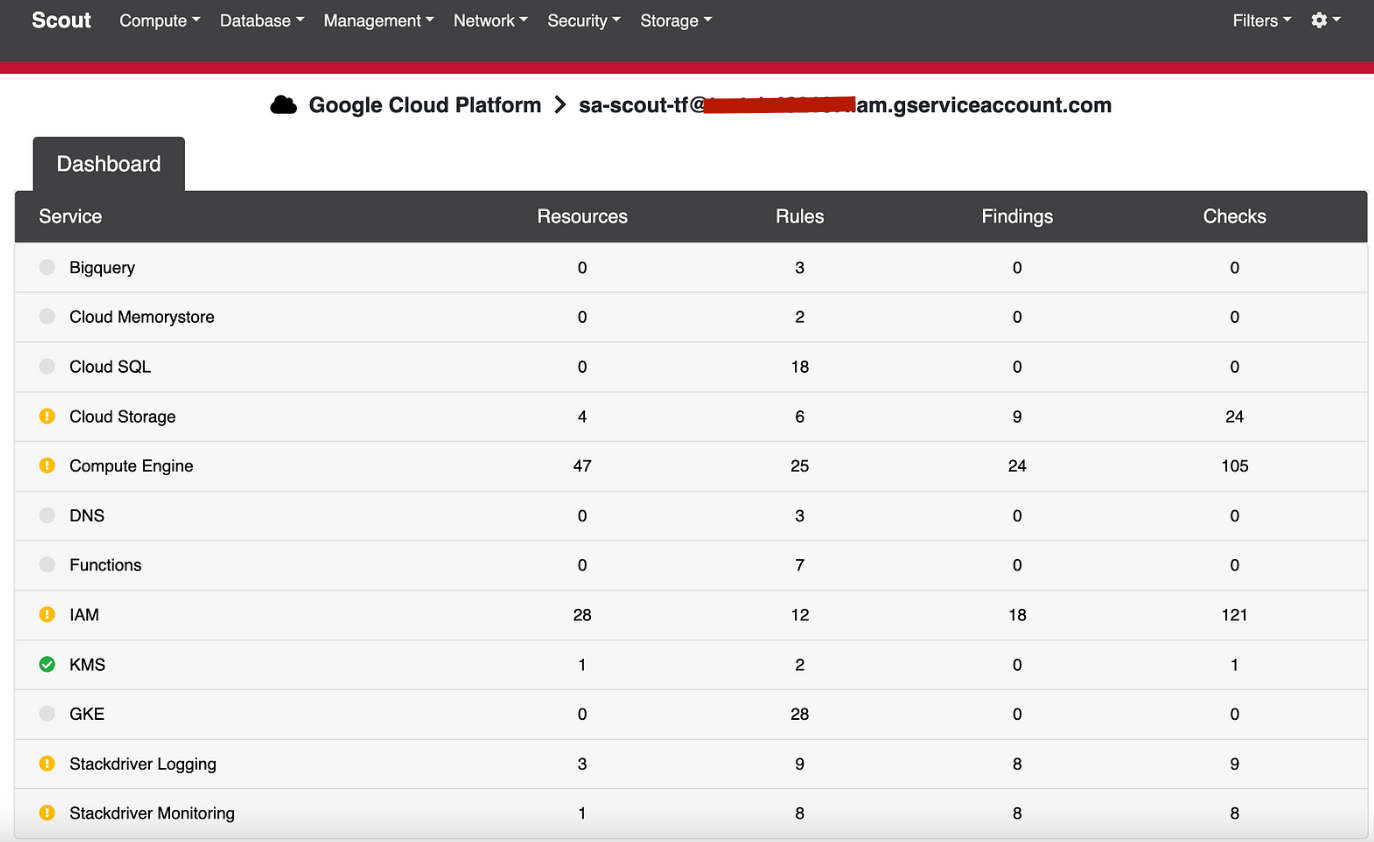
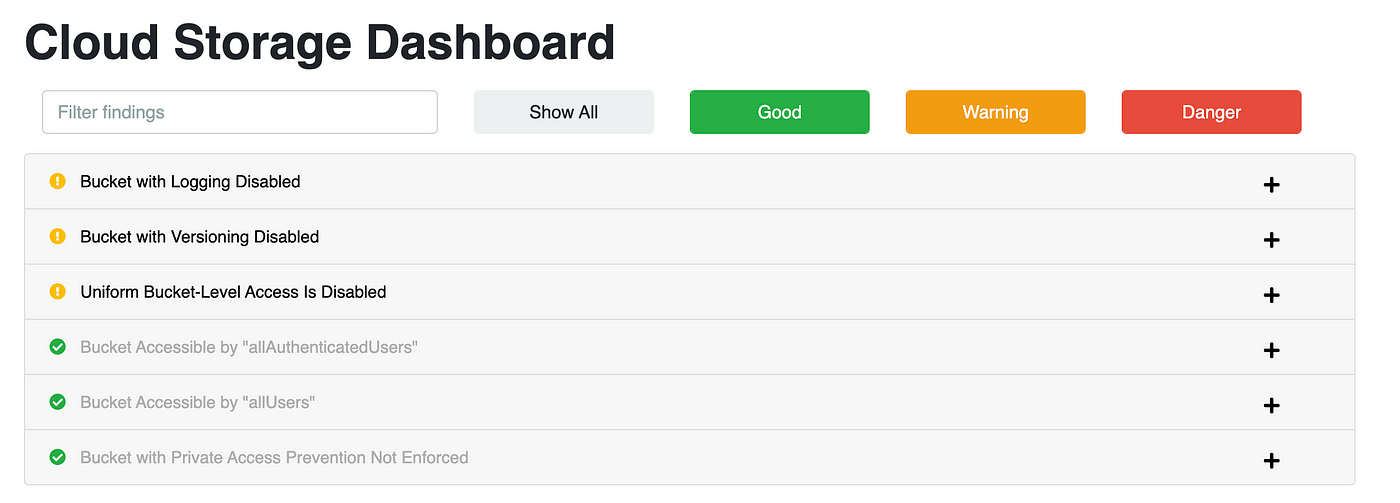
Results
Go to your Storage Bucket and download your report. Here is an example of an IAM and cloud storage report for a test project. You will also see the reports for all APIs enabled in your environment.

Conclusion
Regularly scanning your environment is very important. It helps you stay updated and aware of any changes, threats, or risks that may come up. There are a variety of tools made specifically for this; you should make sure you cover everything and analyze it thoroughly. In my organization, we carefully looked at and chose the tool that matched our needs and requirements the best. Taking the time to pick the right tool can greatly improve your scanning process, which will help you make better decisions and manage risks proactively.